The Bathroom Pod Process
Bathroom pods are not products. They are the result of a defined process.
Twelve operations. One controlled environment. From BIM to plug-and-play delivery.
Safety
Safer on site
Bathroom build moved off the construction floor.
Automation
Automated production
Repeatable, machine-controlled outcomes per pod.
Site flow
Easier site management
One hand-off instead of multiple trades to coordinate.
Logistics
Fewer site deliveries
Pods arrive complete, not piece by piece.
- 01
- 02
- 03
- 04
- 05
- 06
- 07
- 08
- 09
- 10
- 11
- 12
The full process
Twelve operations, in sequence.
Watch the full reel in 5:31.
Design
01-03
 01
Designing Bathroom Pods in BIM
The process begins
Bathroom pods are designed in BIM, where geometry, systems and constraints are fully defined before production starts. The outcome is not just a model. It's a coordinated, build-ready solution.
01
Designing Bathroom Pods in BIM
The process begins
Bathroom pods are designed in BIM, where geometry, systems and constraints are fully defined before production starts. The outcome is not just a model. It's a coordinated, build-ready solution.
 02
Welding the Structural Base
Structure takes shape
The base of the bathroom pod is welded to provide a stable, precise foundation for all subsequent layers. Automation ensures consistency, accuracy and repeatability long before anything reaches the site.
02
Welding the Structural Base
Structure takes shape
The base of the bathroom pod is welded to provide a stable, precise foundation for all subsequent layers. Automation ensures consistency, accuracy and repeatability long before anything reaches the site.
 03
Forming Structural Profiles
Wall structure begins
Steel profiles are formed and shaped to create the structural elements of the bathroom pod walls. Precision at this stage ensures that all components fit together accurately in the next steps of the process.
03
Forming Structural Profiles
Wall structure begins
Steel profiles are formed and shaped to create the structural elements of the bathroom pod walls. Precision at this stage ensures that all components fit together accurately in the next steps of the process.
Production
04-07
 04
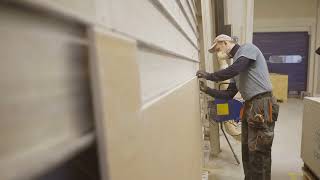
Preparing Wall Panels
Components prepared
Wall panels are cut and shaped to match the defined geometry of the bathroom pod. Precision at this stage ensures a smooth and accurate installation in the next steps.
04
Preparing Wall Panels
Components prepared
Wall panels are cut and shaped to match the defined geometry of the bathroom pod. Precision at this stage ensures a smooth and accurate installation in the next steps.
 05
Robotic Waterproofing of Wall Panels
Protection built in
Waterproofing is applied to wall panels using automated processes, ensuring consistent coverage and controlled application. This step defines the durability and performance of the bathroom long before installation.
05
Robotic Waterproofing of Wall Panels
Protection built in
Waterproofing is applied to wall panels using automated processes, ensuring consistent coverage and controlled application. This step defines the durability and performance of the bathroom long before installation.
 06
Robotic Tile Installation
The finish is applied
Tiles are installed on waterproofed wall panels using robotic arms, ensuring precise alignment and consistent quality across every unit. What is usually done on site is completed here, under controlled conditions.
06
Robotic Tile Installation
The finish is applied
Tiles are installed on waterproofed wall panels using robotic arms, ensuring precise alignment and consistent quality across every unit. What is usually done on site is completed here, under controlled conditions.
 07
Waterjet Cutting of Tiled Panels
Precision, final layer
Openings are cut into fully tiled wall panels using waterjet technology, ensuring clean edges and exact alignment with the design. Every detail is adjusted to fit the system before assembly begins.
07
Waterjet Cutting of Tiled Panels
Precision, final layer
Openings are cut into fully tiled wall panels using waterjet technology, ensuring clean edges and exact alignment with the design. Every detail is adjusted to fit the system before assembly begins.
Assembly
08-11
 08
Assembling the 3D Module
Everything comes together
Wall structures and the base are assembled into a complete 3D bathroom pod, forming the core of the final product. What was previously a set of components becomes a defined, spatial module, ready for the next stages.
08
Assembling the 3D Module
Everything comes together
Wall structures and the base are assembled into a complete 3D bathroom pod, forming the core of the final product. What was previously a set of components becomes a defined, spatial module, ready for the next stages.
 09
Installing MEP Systems
Systems integrated
Plumbing, electrical and ventilation components are installed within the 3D module, following the predefined design. All connections are prepared in a controlled environment, before the module reaches the site.
09
Installing MEP Systems
Systems integrated
Plumbing, electrical and ventilation components are installed within the 3D module, following the predefined design. All connections are prepared in a controlled environment, before the module reaches the site.
 10
Installing Bathroom Fixtures
Final form
Shower cabins, sanitary fixtures and fittings are installed within the module, completing the functional layout. All elements are integrated under controlled conditions, before delivery to site.
10
Installing Bathroom Fixtures
Final form
Shower cabins, sanitary fixtures and fittings are installed within the module, completing the functional layout. All elements are integrated under controlled conditions, before delivery to site.
 11
Sealing and Finishing
Details secured
Sealants are applied to all required joints, ensuring watertightness and long-term performance of the bathroom pod. Precision at this stage is critical for durability and final quality.
11
Sealing and Finishing
Details secured
Sealants are applied to all required joints, ensuring watertightness and long-term performance of the bathroom pod. Precision at this stage is critical for durability and final quality.
Delivery
12
 12
Preparing for Delivery
Leaving the factory
After quality control and final cleaning, bathroom pods are carefully packed and prepared for transport. Each unit is loaded for just-in-time delivery, ensuring it arrives on site ready for installation, exactly when needed.
12
Preparing for Delivery
Leaving the factory
After quality control and final cleaning, bathroom pods are carefully packed and prepared for transport. Each unit is loaded for just-in-time delivery, ensuring it arrives on site ready for installation, exactly when needed.